Dieser Guide erklärt, wie du einen Custom Payment Provider erstellst, der sich in alle ProfitBoost Payment Use Cases einhängt, einschließlich Checkouts, Subscriptions, gespeicherter Zahlungsmethoden und mehr. Durch die Nutzung der ProfitBoost Marketplace und Payments APIs kannst du dein eigenes Gateway oder einen Third-Party Processor verbinden und in allen ProfitBoost Locations (Sub-Accounts) verfügbar machen.
INHALTSVERZEICHNIS
Überblick
Zentrale Konzepte
Voraussetzungen
ProfitBoost Integrationsflow
Schritt 1 – Marketplace App erstellen
5.1 Marketplace Dashboard öffnen
5.2 Einstellungen konfigurieren
5.2.1 Erforderliche Scopes
5.2.2 Redirect URL
5.2.3 Client Keys
5.2.4 Webhook URL (App Install/Uninstall)
5.2.5 SSO Key
5.3 Payment Provider Konfiguration
5.4 Profil
5.5 Custom PagesSchritt 2 – Authentication & Installationsflow implementieren
6.1 Installationssequenz
6.2 Public Provider Config erstellenSchritt 3 – Test & Live Konfiguration verbinden
Schritt 4 – Checkout iFrame Integration implementieren
8.1 Ready Event: custom_provider_ready
8.2 Payment Initiation Event: payment_initiate_props
8.3 Outcome Events
8.3.1 Payment erfolgreich
8.3.2 Payment fehlgeschlagen
8.3.3 Payment abgebrochen
8.4 Verification Call: type: "verify"Schritt 5 – Saved Payment Methods & manuelle Subscriptions
9.1 Zahlungsmethode hinzufügen (Card on File)
9.2 Zahlungsmethoden auflisten – type: "list_payment_methods"
9.3 Zahlungsmethode belasten – type: "charge_payment"
9.4 Manuelle Subscriptions (Subscription Schedules) mit gespeicherten Methoden
9.4.1 Fähigkeit deklarieren
9.4.2 Runtime Flow: type: "create_subscription"
9.4.3 Runtime Flow: type: "cancel_subscription"Schritt 6 – Refunds & weitere Aktionen
10.1 Refund Event – type: "refund"Schritt 7 – Webhooks von ProfitBoost
11.1 Webhook Endpoint
11.2 Unterstützte Events
11.3 Allgemeine Payload-Struktur
11.4 Pflichtfelder je Event
11.5 subscriptionSnapshot Schema
11.6 chargeSnapshot SchemaHäufige Fragen
1. Überblick
Die Custom Payment Provider Framework von ProfitBoost ermöglicht es dir, jedes beliebige Payment Gateway in die Plattform zu integrieren und überall dort zu nutzen, wo ProfitBoost Payments verarbeitet.
Nach der Integration kann dein Payment Provider:
Im App Marketplace und unter Payments > Integrations erscheinen
One-Time- und Recurring Payments verarbeiten
Off-Session Charges durchführen (mit gespeicherten Zahlungsmethoden)
Manuelle Subscriptions und Subscription Schedules unterstützen
Updates über Webhooks an ProfitBoost synchronisieren
2. Zentrale Konzepte
Marketplace App
Der Container deiner Integration im ProfitBoost Marketplace. Definiert OAuth, Scopes, Kategorie und Custom Pages.
Custom Payment Provider
Die Payment-Konfiguration, die ProfitBoost mitteilt, dass deine App ein Payment Provider ist und welche Payment Types unterstützt werden.
queryUrl
Ein Backend Endpoint, den ProfitBoost für Server-Side Payment Operations aufruft, z. B.:
verify
refund
list/charge payment methods
create/cancel subscriptions
paymentsUrl
Eine öffentliche URL, die im iFrame geladen wird und den Checkout darstellt.
Custom Page
Eine UI-Seite im iFrame für Konfiguration (API Keys, Merchant IDs etc.).
Test vs Live Mode
Test Mode: Sandbox
Live Mode: echte Zahlungen
3. Voraussetzungen
Du benötigst:
Zugriff auf das ProfitBoost Marketplace Dashboard
Backend Service (Node.js, Python, Ruby etc.)
Public Domain für:
OAuth Redirect URL
Custom Page
queryUrl & Webhooks
paymentsUrl
Kenntnisse in:
OAuth 2.0
JSON & HTTP APIs
Webhooks
4. ProfitBoost Integrationsflow
Marketplace App erstellen (Custom Payment Provider Kategorie)
Backend Service implementieren (OAuth, Webhooks, queryUrl)
Public Pages bereitstellen (Config + Checkout iFrame)
Test & Live Flow konfigurieren und End-to-End testen
5. Schritt 1 – Marketplace App erstellen
5.1 Marketplace Dashboard öffnen
https://marketplace.gohighlevel.com
Neue App erstellen und konfigurieren:
Settings
Payment Provider
Profile
Custom Pages
5.2 Einstellungen konfigurieren
5.2.1 Erforderliche Scopes
payments/orders.readonly
payments/orders.write
payments/subscriptions.readonly
payments/transactions.readonly
payments/custom-provider.readonly
payments/custom-provider.write
products.readonly
products/prices.readonly
5.2.2 Redirect URL
Beispiel:
https://your-domain.com/installed?code=...
5.2.3 Client Keys
Sicher auf Backend speichern. Für OAuth Token Exchange genutzt.
5.2.4 Webhook URL (Install/Uninstall)
Wird bei Installation/Deinstallation aufgerufen.
5.2.5 SSO Key
Wird verwendet, um Tokens im iFrame zu entschlüsseln.
5.3 Payment Provider Konfiguration
Name
Beschreibung
Payment Provider Type:
OneTime
Recurring
Off Session
Logo URL
5.4 Profil
Kategorie:
Third Party Provider
5.5 Custom Pages
Public iFrame Seite für:
API Keys
Test/Live Mode
Konfiguration
6. Schritt 2 – Authentication & Installation Flow
6.1 Installationssequenz
Redirect mit OAuth Code
Token Exchange
Custom Page laden
Public Provider Config erstellen
6.2 Public Provider Config erstellen
{ "name": "My Payment Provider", "description": "Tagline or short description", "imageUrl": "https://your-domain.com/logo.png", "locationId": "GHL_SUB_ACCOUNT_ID", "queryUrl": "https://your-backend.com/payments/query", "paymentsUrl": "https://your-frontend.com/payments/checkout"}7. Schritt 3 – Test & Live Konfiguration
Test Keys im Custom Page UI eingeben
Connect Config API aufrufen
Danach Live Keys konfigurieren
Default Gateway in Payments > Integrations setzen
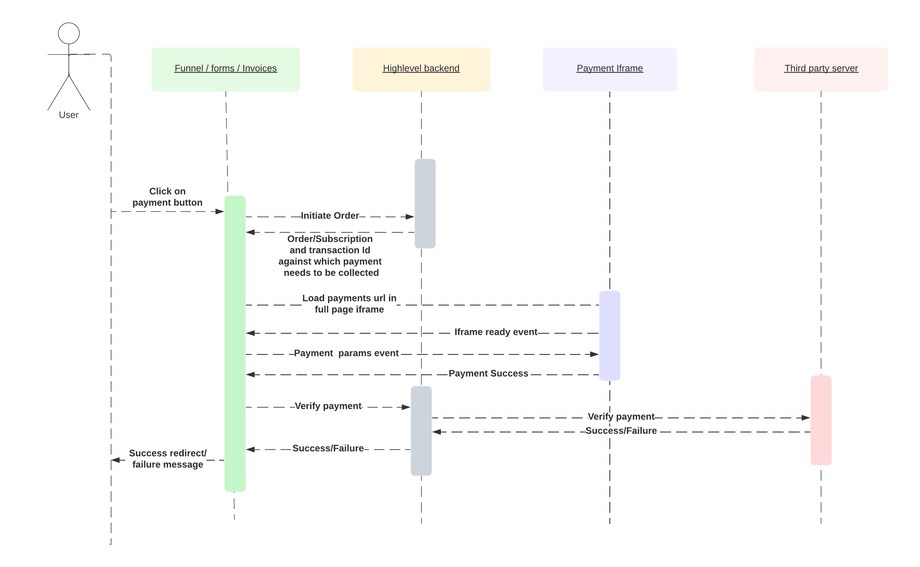
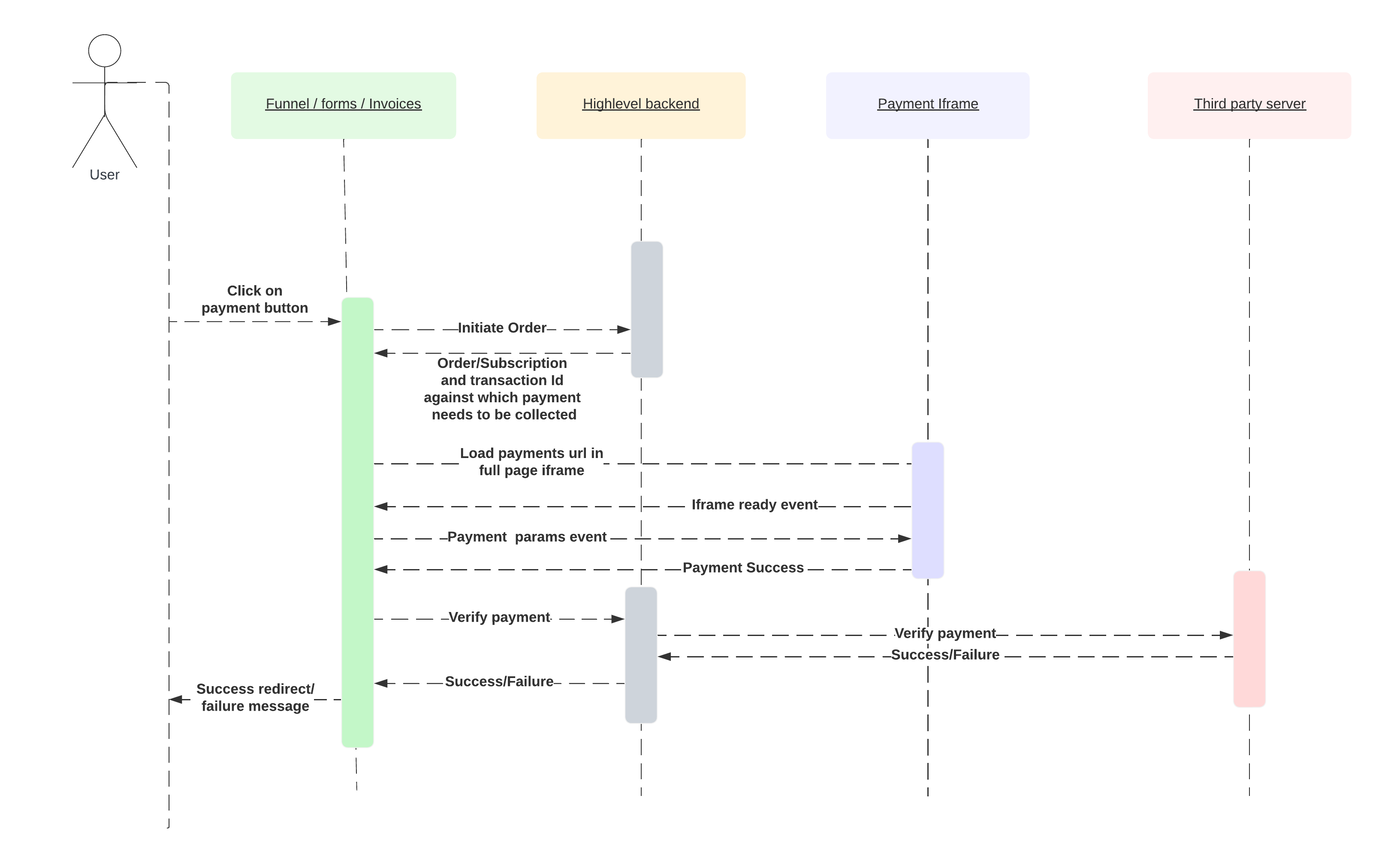
8. Schritt 4 – Checkout iFrame Integration
8.1 custom_provider_ready
{ "type": "custom_provider_ready", "loaded": true}8.2 payment_initiate_props
(Beispiel Payload bleibt unverändert strukturell)
{ "type": "payment_initiate_props", "amount": 100, "currency": "USD"}8.3 Outcome Events
8.3.1 Success
{ "type": "custom_element_success_response", "chargeId": "GATEWAY_CHARGE_ID"}8.3.2 Failure
{ "type": "custom_element_error_response", "error": { "description": "Card was declined" }}8.3.3 Cancel
{ "type": "custom_element_close_response"}8.4 verify Call
ProfitBoost ruft dein Backend auf:
{ "type": "verify", "transactionId": "ghl_transaction_id", "apiKey": "YOUR_API_KEY", "chargeId": "gateway_charge_id", "subscriptionId": "ghl_subscription_id"}Response:
{ "success": true }9. Schritt 5 – Saved Payment Methods & Subscriptions
9.1 Card on File aktivieren
{ "type": "custom_provider_ready", "loaded": true, "addCardOnFileSupported": true}9.2 list_payment_methods
Request:
{ "type": "list_payment_methods"}9.3 charge_payment
Request:
{ "type": "charge_payment"}9.4 Subscriptions
9.4.2 create_subscription
{ "type": "create_subscription"}9.4.3 cancel_subscription
{ "type": "cancel_subscription", "subscriptionId": "SUBSCRIPTION_ID", "apiKey": "API_KEY"}Response:
{ "status": "canceled" }10. Schritt 6 – Refunds
{ "type": "refund", "amount": 50.00, "transactionId": "TRANSACTION_ID", "chargeId": "CHARGE_ID", "apiKey": "API_KEY"}Response:
{ "success": true, "message": "Refund successful", "id": "REFUND_ID", "amount": 50.0, "currency": "USD"}11. Schritt 7 – Webhooks von ProfitBoost
Endpoint:
https://backend.leadconnectorhq.com/payments/custom-provider/webhook
Events:
subscription.trialing
subscription.active
subscription.updated
subscription.charged
payment.captured
12. Testing & Go-Live Checklist
Marketplace App erstellt
OAuth funktioniert
queryUrl implementiert
paymentsUrl iFrame aktiv
verify Flow funktioniert
Saved Methods implementiert
Subscriptions aktiv
Refunds getestet
Webhooks aktiv
End-to-End Test in Test & Live Mode
13. Häufige Fragen
Q: Kann ich mehrere Payment Gateways integrieren?
Ja, pro Location konfigurierbar.
Q: Unterstützt ProfitBoost Testing?
Ja, Test Mode + Sandbox.
Q: Wer übernimmt Recurring Billing?
Dein eigenes System.
Q: Warum bleibt Subscription auf “Incomplete”?
verify Response ist entscheidend, nicht nur Webhooks.